In this workshop we will be researching into different game main menus and finding out the importance’s of the design and usability of them. The first thing a player sees in any game is a menu. This “face” of a game is what gives them the opportunity to feel the atmosphere of a game from the very first seconds.
Within these main menu I can see that the main focus is the background as the writing is placed in the corner to show the design off more. The tabs to entre the game, options or exit are written in bold writing as it allows the viewer to see they more cleaner and is more impactful. When scrolling down through the option tabs the writing becomes a brighter white and has a box around it to show which one you’re on. This is a common way a main menu is set up by making the background image to be the main focus ands the writing for the options on a side with the name of the game in a corner. This is so the main menu isn’t cluttered and is clean to the players eye to understand where everything is. These are the similarities within the main menus of certain games.
The difference within this game menu is that they use buttons on the left hand side panel rather than writing to give the screen more view on the character and objects on sale. This is more to give the viewer time to notice they are selling certain things and instituting them before entering the shop option. In my opinion the button opinion isn’t the greatest as a player who is new may not know which button is what and could get confused.This main menu is a lot cleaner with the options at the top, which is a common design within newer games. Then then have the options such as character picking set up in the design of the game using colours and shapes to their advantage for the design.
The genre and company of the game also affects what the main menu will look like. For example a horror game will be dark and mysterious whereas a child friendly Disney game will have bright colours and most likely music.
Making our own Main Menu
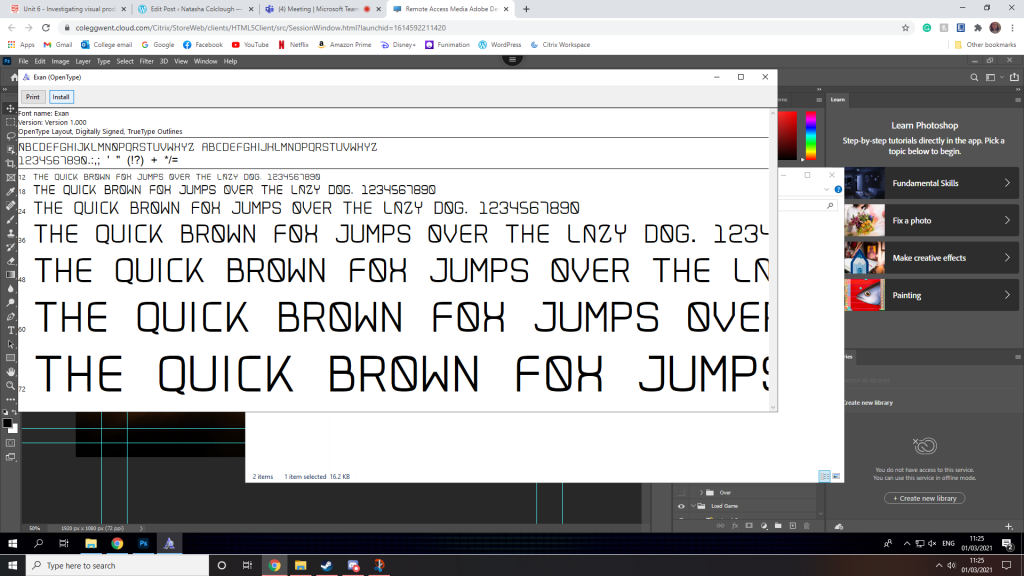
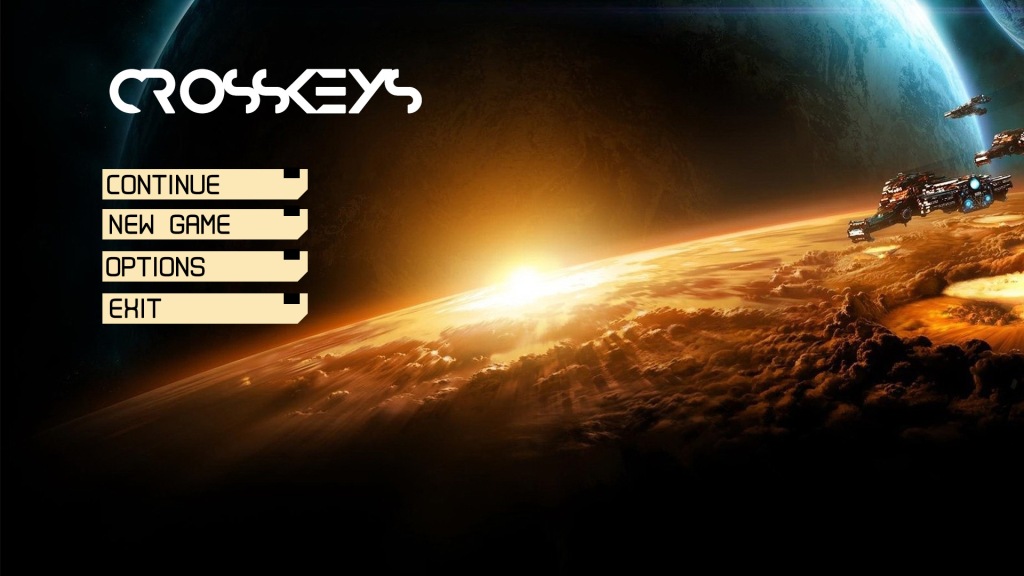
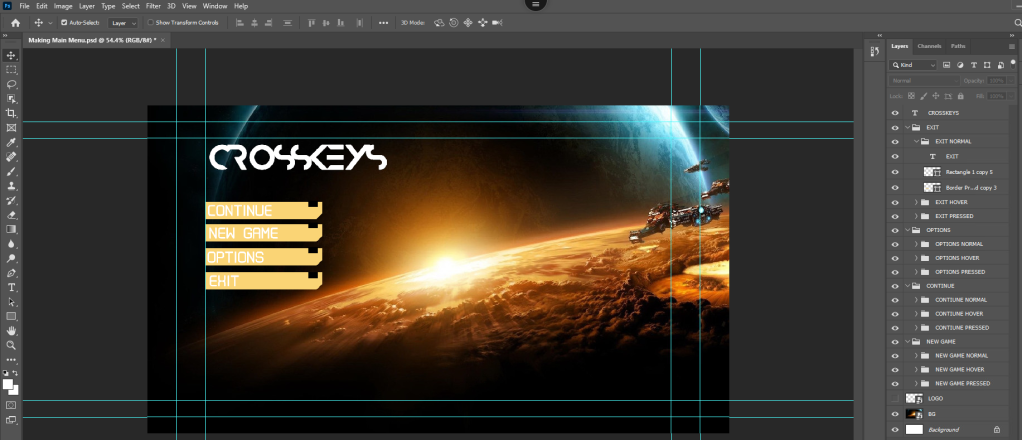
We first load up photoshop and set up the file. We will be using the film and video option and selecting the 720p on the size and quality. There are added guild lines on the canvas as it gives you a reference to where you should place certain information, this is because tv sizes are different throughout showing games or movies so keeping writing or main images within the main square make it so that you know its compatible with most tv sizes.We next installed a text font that we will be using for our main menu.We added the background and logo to our new file by copying over the image and name to get a reference to where things should be placed.Added 3 groups and changed the design. I then added a text for the name of the game which is Crosskeys and changed the font to the one we installed. I then also added the ‘New Game’ with a background to make it stand out. We did this 3 times as we needed the design to change when the player is hovering over the option, clicking it and not on it at all. This will make a difference within the game to allow the player to know what they are selecting.
Fonts
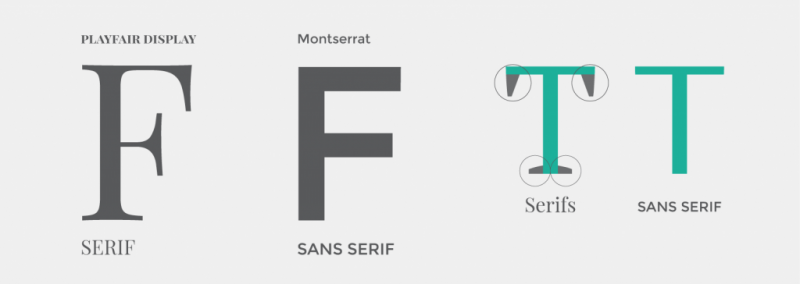
A serif is a decorative stroke that finishes off the end of a letters stem (sometimes also called the “feet” of the letters). In turn, a serif font is a font that has serifs, while a sans serif is a font that does not (hence the “sans”).
The design of the writing and font used displays a genre such as having a font that is serif that can be used for more medieval/ fantasy design and the sans serif fonts can be used for more modern sci-fi games. Fonts and sizing on main menus allows the viewer to be more forced on what is bigger and brighter. Background allow the user to know what the game is about through a singular image and takes up most of the screen.
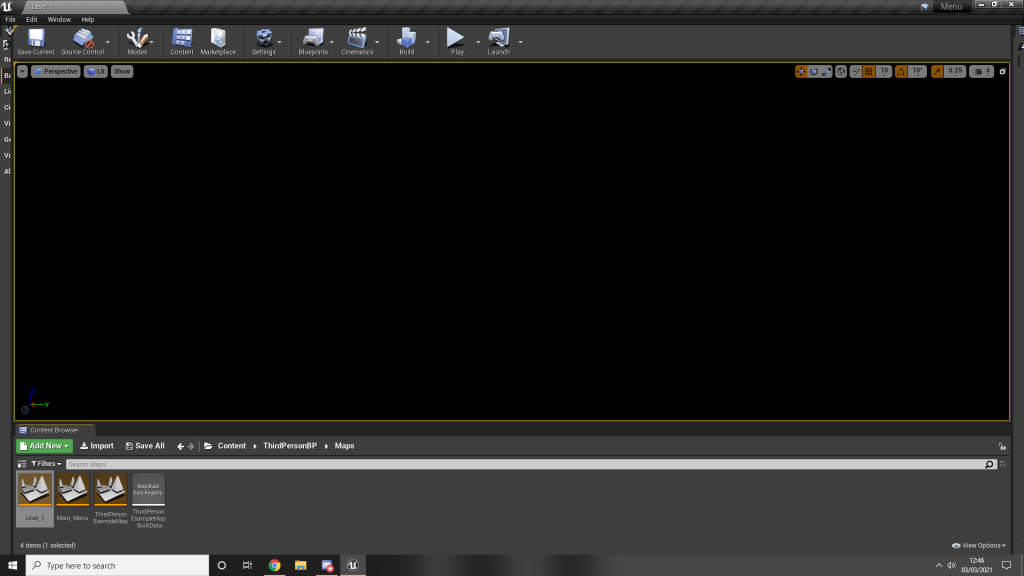
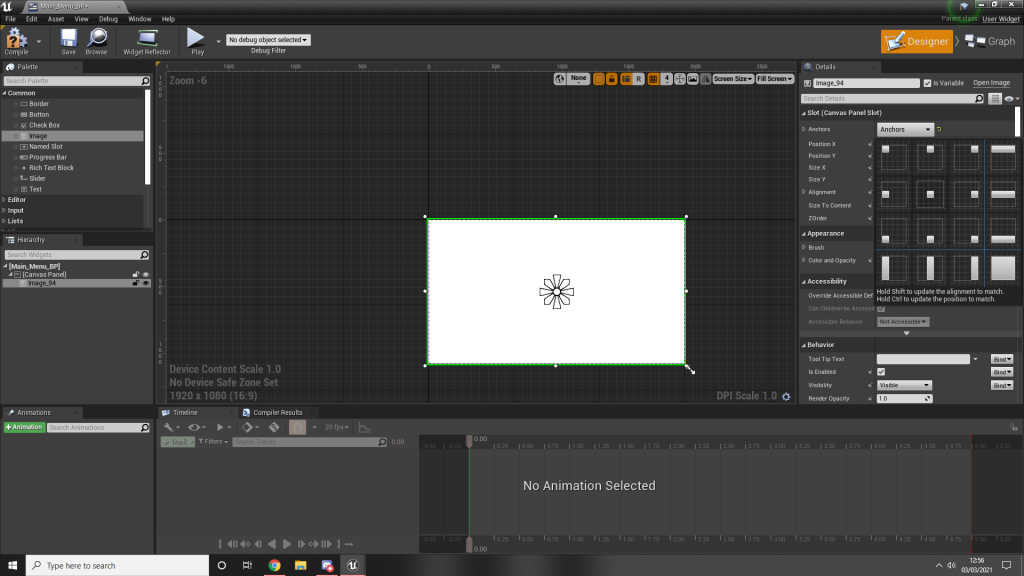
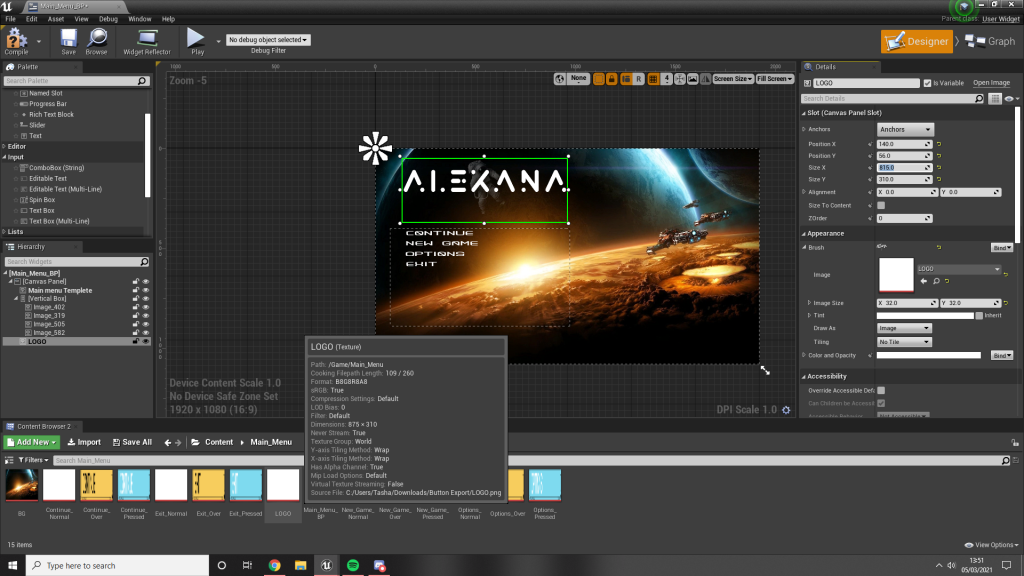
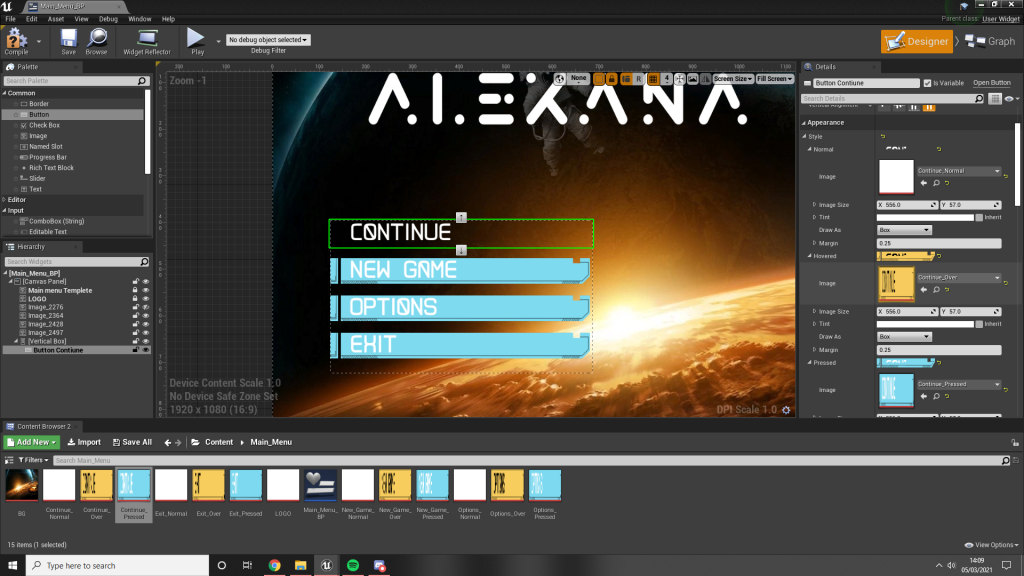
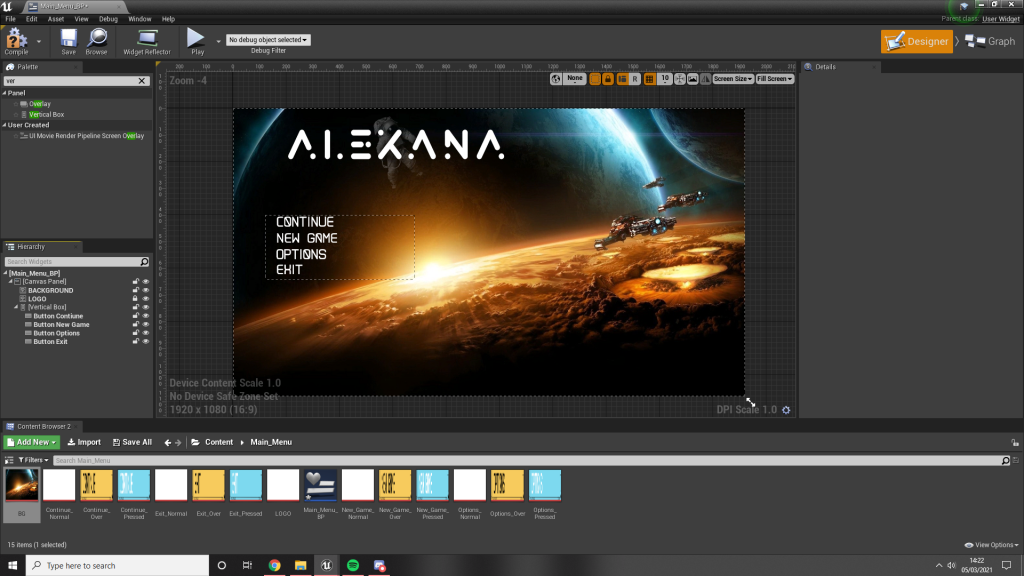
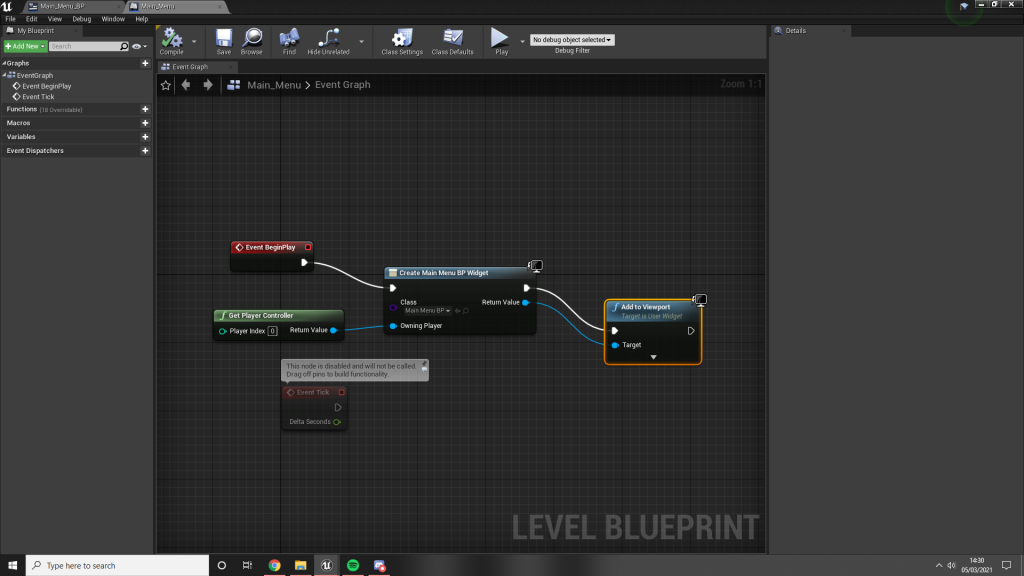
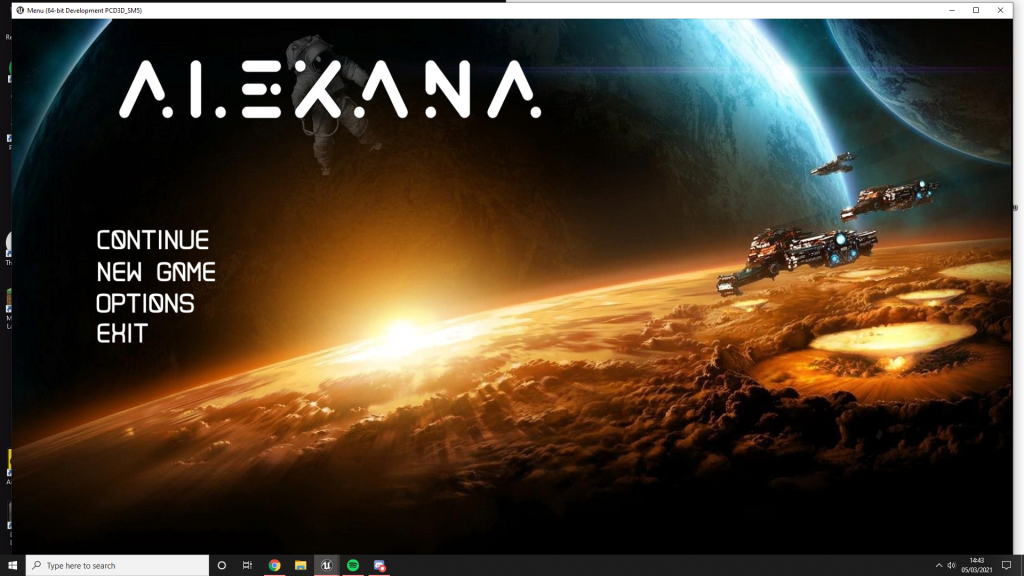
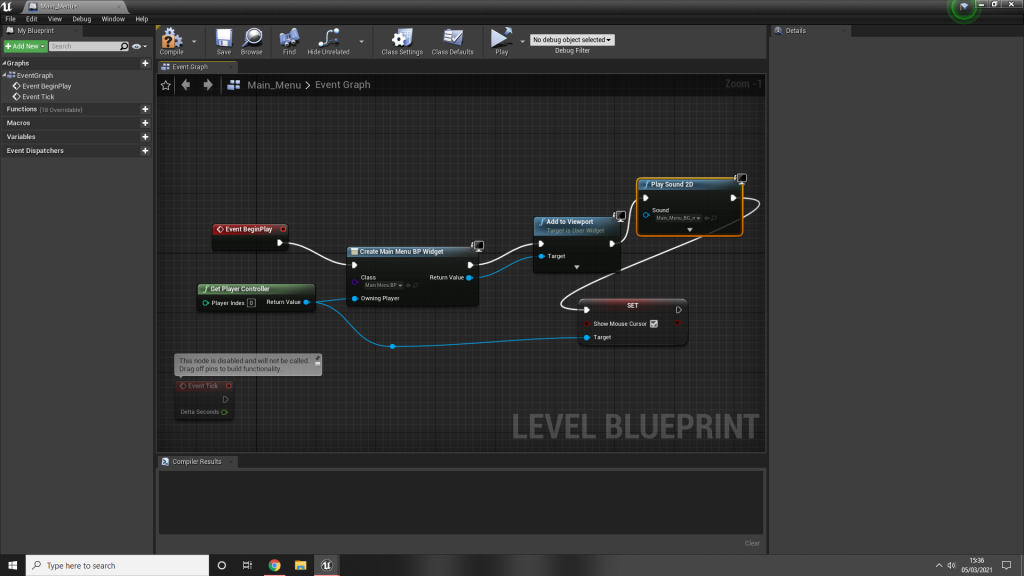
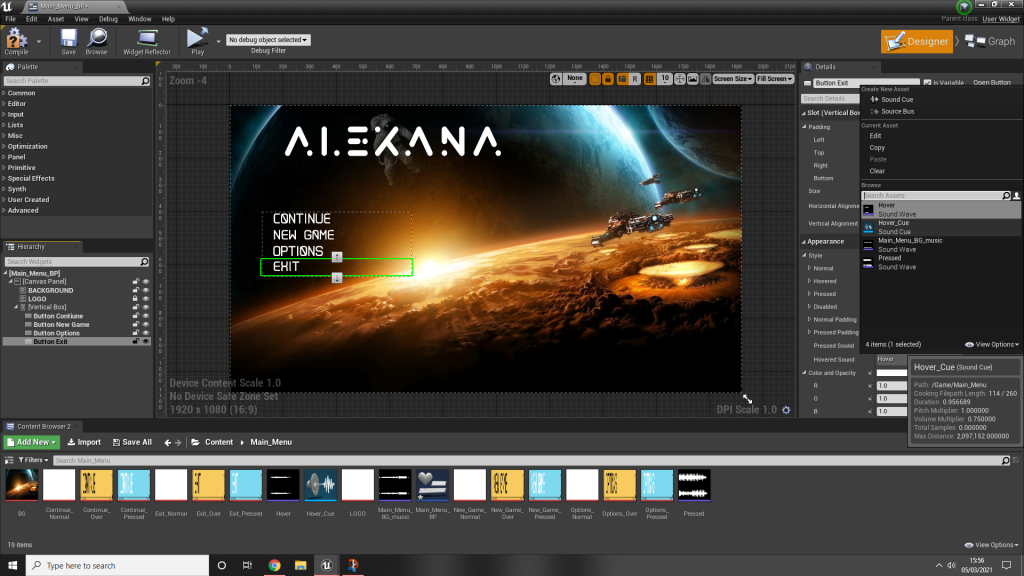
I made sure to have folders with each of the tabs labelled and checked that each of the colours matched such as all the pressed where it same colour. We then chose one of the layouts and exported it out as a template so we can see what it will look like in unreal.At this stage I had to export each of the labels so that I can move then area in unreal and place them correctly. For some reason exporting them out wasn’t working for me and I had to use the tutors one.Once I downloaded the images I loaded up unreal engine and set up a file for a new level.I then imported in the images and can be seen on the shelf and in the content folder.To make the animation for the main menu we use a widget for the template we can find this by right clicking an empty area and going down to user interface and widget blueprint and renaming it. We could then double click it to load up the menu for placing in the images.To start off we had to set resolution to a 1080p TV screen so that it will fit onto most screens.As a test we clicked on the ‘image’ box within the common section and then saw a flower type shape that represents the anchor. we used the drop down option on the right and selected the one in the middle of the screen. This is so that if the screen sizes was to change the image would stay in the centre.For the next stage I worked on placing the background and logo onto the widget and used the vertex box with the buttons to allow the writing to become the buttons.When bringing in the logo and buttons I can make sure its the same size as it would be on the template by hovering over the logo option in the panel where it shows me the dimensions and then I can type those into the sizing to get the correct size.For the buttons to work we have to place the images within the normal, hover and pressed state so that when the command happens it knows to show that image.Now that we have done that once we can duplicate the button and replace the continue for new game and the rest.Now that all the buttons are set the the right commands we can remove the template in the background.We now have this.Our next stage is to get the main menu showing when I click play, we do this by going onto project settings and having the Editor start-up map and Game Default map set to our Main menu. This is found within the Maps and Modes.This is the blueprint we use to allow the widget to show up when we click play. We can then go back and see if it works when we save this. Our next stage was to make the game load up like it was a real game, this was easy to do by clicking the drop down option on the play button and clicking ‘Standalone Game’ When we did this our mouse cursor was now working so we had to go back into the blueprints and add the mouse cursor. Like so.I can now see that I have control of my mouse when in the menu and the buttons work when hovering and pressing them.
Audio in Unreal Engine
Our next stage now that we have done most of the visual side of the main menu is to work on adding audio, this includes the sounds from the buttons and the background music.
Sound is vital to creating believable and immersive environments. From ambient sounds to interactive sounds of vehicles or weapons, from music cues to spoken dialog, audio in a game can make or break the user experience.
Unreal Engine 4 (UE4) supports importing 16-bit and 24-bit, PCM-formatted .wav files at any sample rate for up to 8 channels. For convenience, it also supports importing Ogg-Vorbis, AIFF files, and FLAC files, though it internally converts them to 16-bit format PCM files.
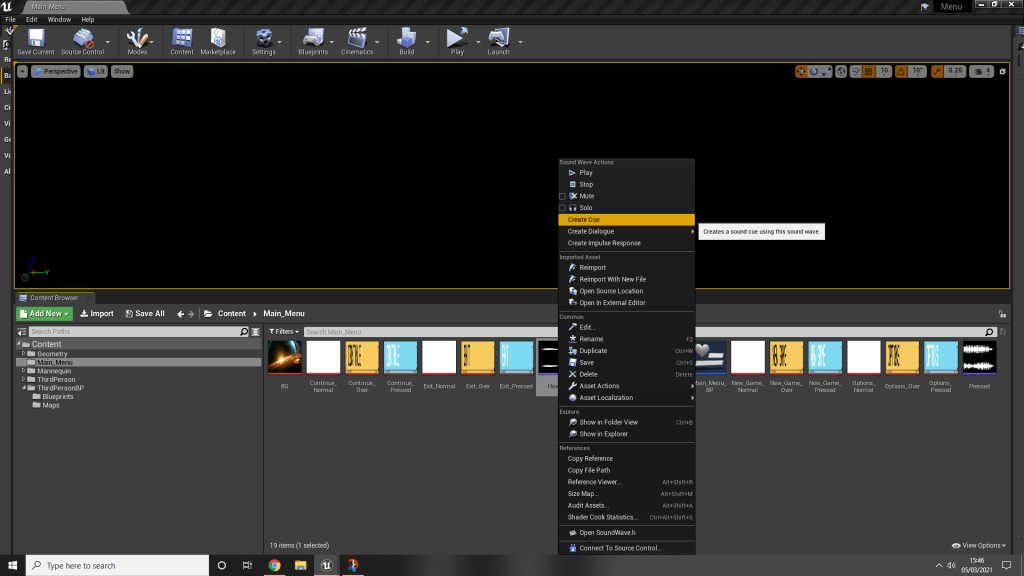
When we work with audio such as the background music we can double click it on the shelf and will load up some settings that are available to us. For this we added looping as we want to background music to repeat over when its done. This is where we can make the basic edits to the audio such as change the volume and adding the loop option.To get the background music to work all we have to do is go onto the level blueprints and add a 2D sound onto our viewport on and select the background music from the dropdown option.To add the sound affect of the pressed and hover noises we go back into the widget menu and on each of the buttons we can go onto appearance and find the pressed and hover sound option where we can then select the sounds to input them into the menu.Our next stage was to improve our sound for when we hover over the buttons, at the moment they would make the same sound which can be repetitive to the player. We can edit this by right clicking the hover sound and creating a cue.We then go onto the cue and add in a blueprint called a Modulator, this goes in the middle for the sound and its output as when it goes through the modulator it choose random pitch of the sound so that it doesn’t sound repetitive. To edit the amount that it will change in pitch and volume we go onto the left panel and change the max and min to have a higher amount between them adding more range.I then have to go back onto the widget and change out the hover sound for the new hover cue.I then do the same for the pressed sound, I can test out whether the min and max for the pitch and volume is good by clicking the pick cue a couple times. I followed the same method as I did for the hover cue and made sure to test it by loading up the standalone game option.
Functionality
To add functionality to the buttons we can go back onto the widget and select one of the buttons and scroll down to the events section, this shows where we can add events to happen when we click, press, release etc. We want to add a event when the user releases the mouse from clicking the button to then load up the level.We work on the release option of the mouse and loaded up the blueprint for it and added a ‘Open Level’ and typed in the name of the level we want it to load. This is simple to add so that when we load the game up and click onto on of the buttons that we added this to it will load up the basic level that unreal has at the start.
Adding videos into unreal engine
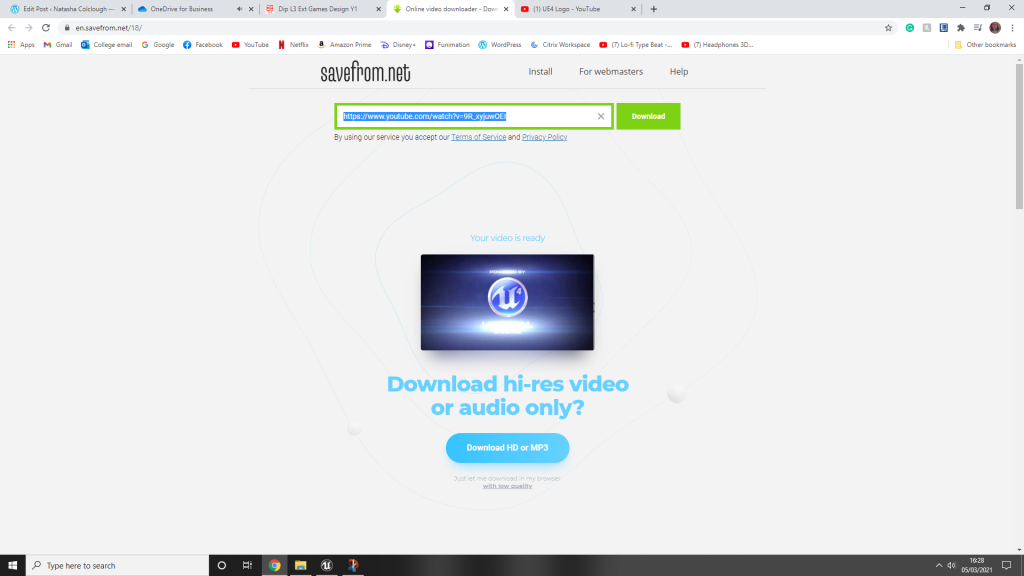
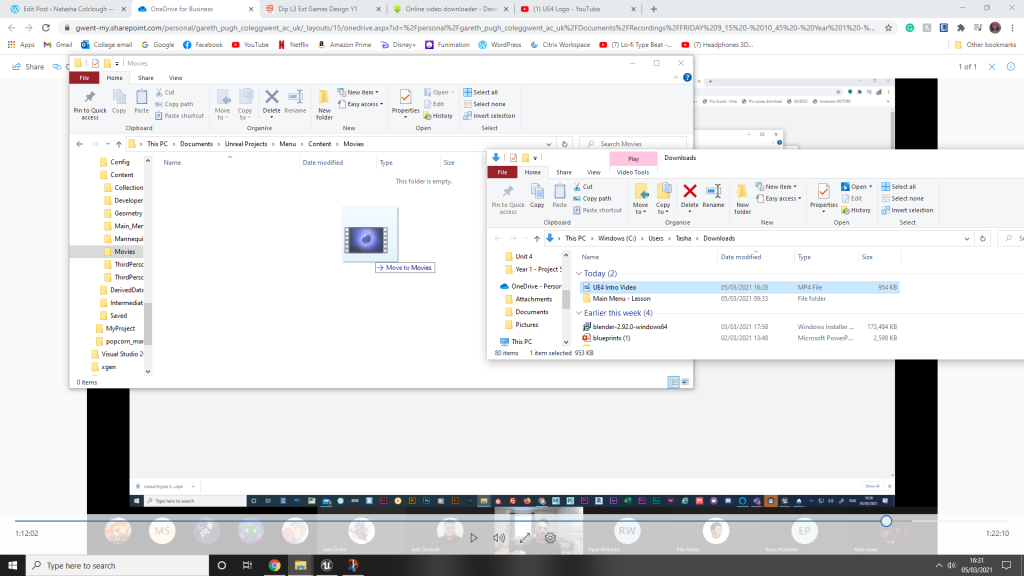
Unreal wants you to add movies in a certain way for them to work properly so for this we click on the Content folder on the left and select ‘Show in explorer’ This will direct me to where it is saved on my computer where I can then add a new folder called Movies. We use the file format or MP4 as unreal access these as video flies and work correctly.We are working on adding a video for the intro of the main menu, for this I wanted to have the normal unreal engine logo to come up. I found a quick video on youtube and used this website to download it into a MP4.
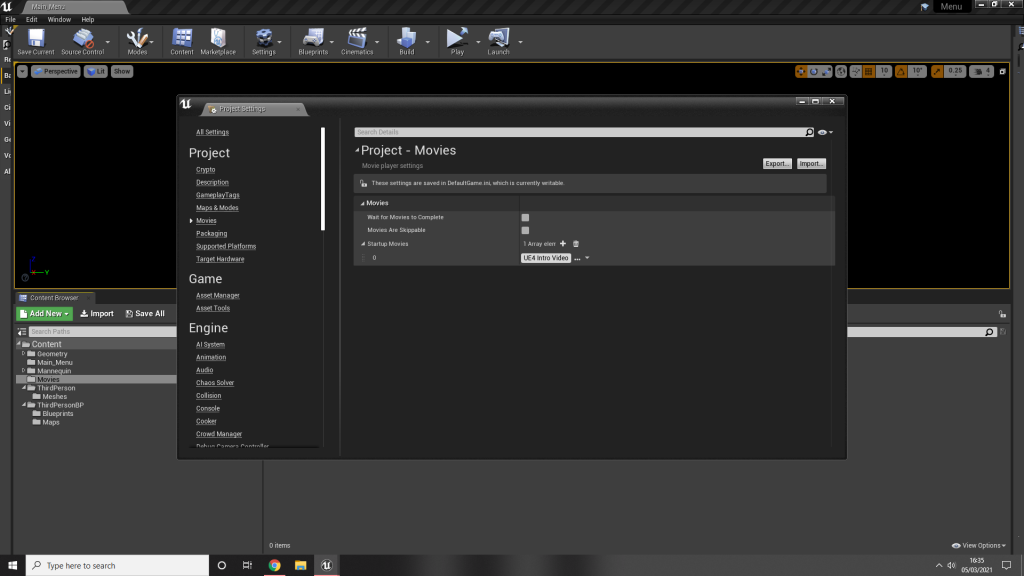
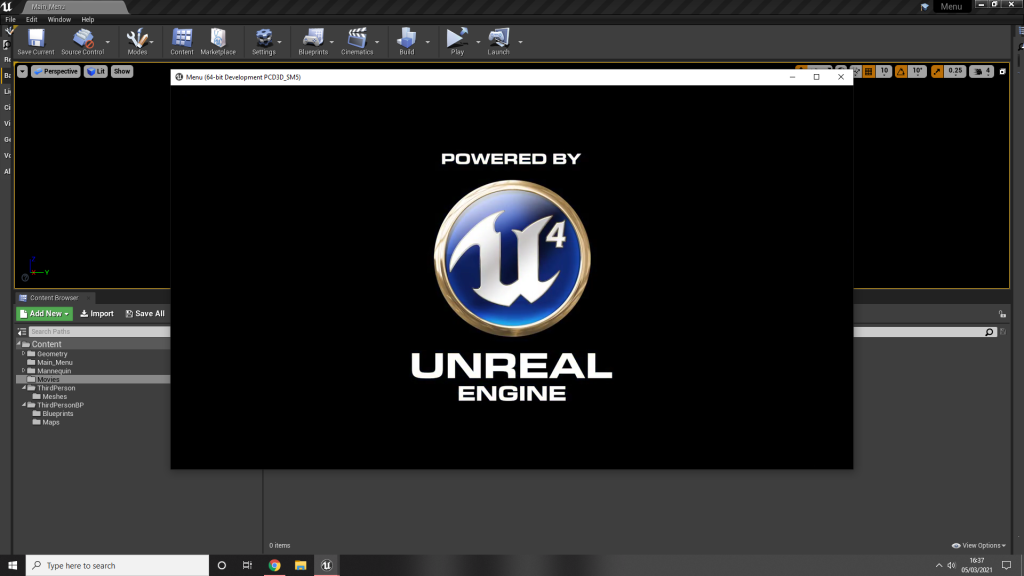
We then copy it into the movies folder we are using.To get the videos loaded as a intro for this to work we go onto project settings and selection movies on the left hand side and click the little plus on the start up movies and then locate the intro we want and select that.We also had to make sure to tick the ‘complete movie’ option otherwise it will stop after a few seconds. It also gives you the option to allow the intros to be skipped this is for instant if there is a long intro.I can now see that when I load up the game, the intro I downloaded and imputed into unreal is showing at the start.
Conclusion
For this workshop I had to work from home so to access photoshop I needed to use the citrix workspace, I struggled with this part of the workshop as it wasn’t working properly and was extremely slow. I also felt that I was falling behind with this and had to catch up in my own time so personally I didn’t find this very fun. After a few tries I did figure out how to make the main menu work with the buttons and intro video. If I was to do this workshop again or something similar, I think I have a better understanding now and could improve the work.